프로젝트 개요Project Overview
늦잠 잔 여행 당일. 8시 30분에 눈을 떴고 9시 기차를 타야 한다. 캐리어 공간은 부족하다. 무엇을 넣고 무엇을 포기할지가 이 게임의 유일한 의사결정이다.
You overslept on the morning of a trip. It is 8:30 AM, your train leaves at 9:00 AM, and your suitcase is too small. Deciding what to pack and what to leave behind is the central decision of the game.
| 항목 | 내용 |
|---|---|
| 개발 기간 | 2026.07.26 ~ 07.30 — 한 달 일정의 게임잼을 5일에 완주 |
| 엔진 | Unity 6000.0.68f1 / URP 17.0.4 / Input System 1.18 |
| 빌드 | WebGL (WebGL2 · Brotli + Decompression Fallback) · Windows Standalone |
| 역할 | 1인 개발 — 기획 · 시스템 설계 · C# 구현 · 연출 · 프로시저럴 레벨 생성 · 배포 |
| 주제 | INVENTORY |
| 리소스 | 프리팹 · 가구 · 아이템 전부 코드 생성. 폰트만 무료 에셋(Pretendard, OFL) |
| Item | Details |
|---|---|
| Development Period | 2026.07.26 ~ 07.30 — Completed a month-long game jam scope in 5 days |
| Engine | Unity 6000.0.68f1 / URP 17.0.4 / Input System 1.18 |
| Build Targets | WebGL (WebGL2 · Brotli + Decompression Fallback) · Windows Standalone |
| Role | Solo development — game design, systems architecture, C# implementation, procedural scene generation, deployment |
| Jam Theme | INVENTORY |
| Assets | All prefabs, furniture, and items generated procedurally in code; only the font is an external asset (Pretendard, OFL) |
인벤토리를 장식이 아니라 게임으로Making the Inventory the Game Itself
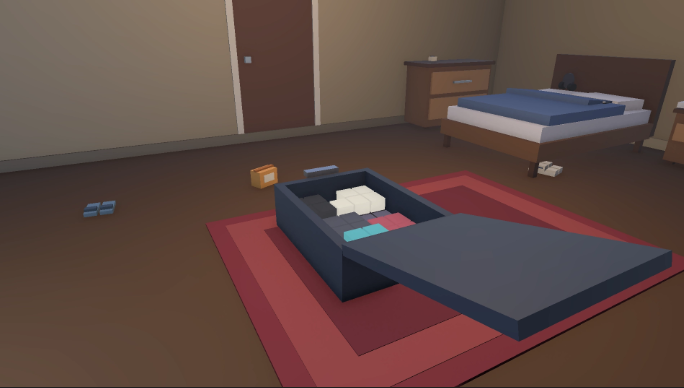
주제가 인벤토리였다. 대부분의 게임에서 인벤토리는 창을 열고 아이템을 확인하는 부속품이다. 그걸 게임 그 자체로 만들려면 인벤토리에서 내리는 결정이 곧 게임의 결정이어야 한다. 그래서 설계를 이렇게 잡았다.
The jam theme was INVENTORY. In most games, the inventory is a secondary menu you open to check items. To make the inventory the game itself, every spatial trade-off inside the grid had to drive the core loop.
손은 개수가 아니라 칸으로 센다Hands Count Slots, Not Item Count
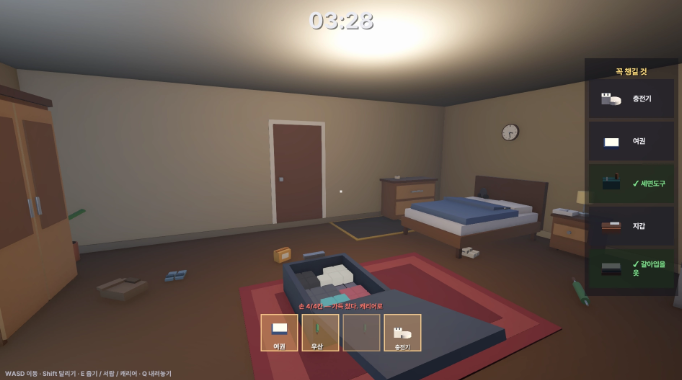
- 여권 1칸 · 노트북 2칸 · 백팩 3칸. 손은 총 4칸이다.
- 백팩을 들면 남는 건 1칸이라 노트북을 못 든다.
- "이번 왕복에 무엇을 들고 갈까"가 그대로 선택이 된다.
- A passport takes 1 hand slot, a laptop takes 2, and a backpack takes 3. Your hands have 4 slots in total.
- If you pick up the backpack, only 1 slot remains—so you cannot carry the laptop on the same trip.
- "What do I carry on this trip across the room?" becomes an immediate routing decision.
5×6 격자에 2단으로 쌓는다Two-Layer Stacking on a 5×6 Grid
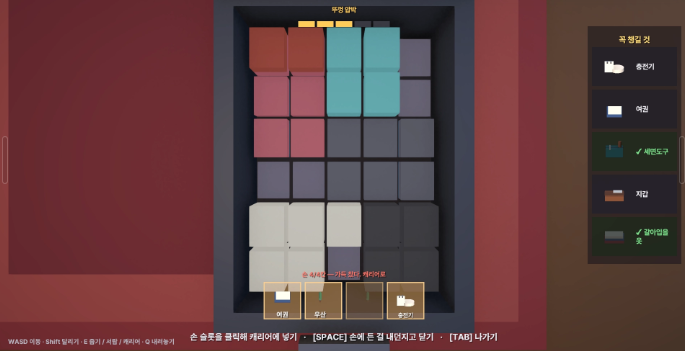
물건마다 차지하는 모양과 두께가 다르다. 얇은 물건 위에는 다른 물건을 얹을 수 있고, 밑에 깔린 것은 위를 먼저 빼야 꺼낼 수 있다. 배치가 되돌리기 비용을 만든다.
Every item has its own footprint and thickness. Thin items allow another layer to be stacked on top, and anything pinned underneath cannot be removed until the top layer is lifted first. Placement order creates an undo cost.
어떻게 쌌느냐가 닫기 난이도가 된다How You Pack Determines How Hard the Zipper Is to Close
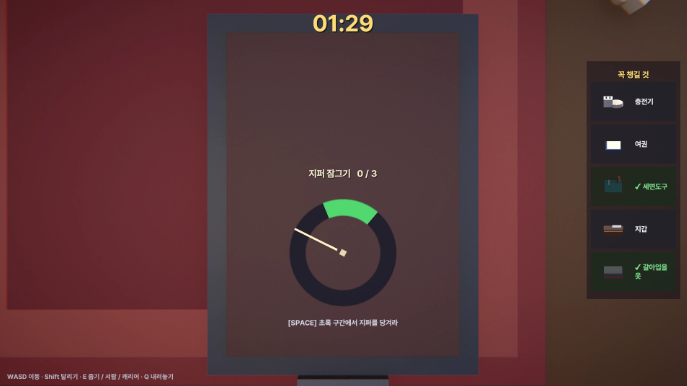
채움률 · 초과 높이 · 울퉁불퉁함을 섞어 뚜껑 압박도를 계산하고, 그 값이 지퍼 QTE의 바늘 속도와 성공 구간 폭을 결정한다. 무리해서 쌓으면 가방이 터지고 물건이 방바닥에 쏟아진다.
Fill rate, over-height ratio, and surface unevenness combine into a Lid Strain score, which controls needle speed and target zone width during the zipper QTE. Overstuffing the suitcase causes it to burst open, scattering items back onto the floor.
1막의 결과가 2막으로 돌아온다Act 1 Choices Carry Over Into Act 2
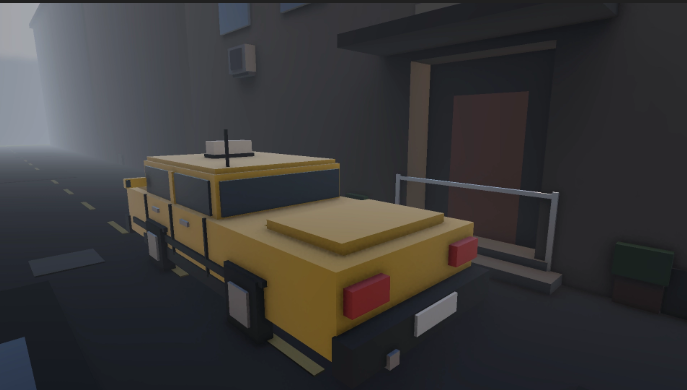
캐리어에 안 들어가는 큰 짐은 현관 앞으로 날라 둔다. 2막에서는 그것들을 완성한 캐리어와 함께 택시 트렁크에 다시 싣는다. 1막에서 얼마나 빵빵하게 쌌는지가 2막에서 덩어리 크기로 돌아온다.
Oversized items that don't fit inside the suitcase are carried to the front door mat. In Act 2, you load those oversized items alongside your packed suitcase into a waiting taxi trunk. How tightly you packed in Act 1 determines the bulk you have to fit in Act 2.
놓고 온 물건이 문장으로 남는다Every Forgotten Item Leaves a Sentence Behind
아이템 31종 전부가 고유한 회고 문구를 갖는다. "여권을 두고 왔다"가 숫자가 아니라 문장으로 남는다.
All 31 items have their own epilogue line in the results screen—leaving your passport behind shows up not just as a point deduction, but as a specific story beat.
씬을 손으로 만들지 않았다Baking the Entire Scene from Code
5일이라는 기간에서 가장 큰 속도는 여기서 나왔다. 가구·아이템 프리팹 제작부터 방 배치, 시스템 배선까지 전부 에디터 스크립트(JamSceneBuilder)로 굽는다.
Finishing in five days was possible because I never built scenes by dragging objects in the Inspector. Everything—from generating furniture and item prefabs to room layout and component wiring—is baked by an editor script (JamSceneBuilder).
속도만의 문제가 아니었다. 좌표가 코드에 있으니 검증도 코드로 할 수 있다. 그래서 배치 실수를 빌드 시점에 경고로 잡는 장치를 함께 만들었다.
That gave me more than speed: because all coordinates live in code, spatial verification can also run in code. I added build-time geometry checks that flag layout mistakes with warnings whenever the scene is baked:
WarnIfInDepartureLane— 골목 소품이 택시 주행 차선(z≈−5.6)을 침범하면 경고. 엔딩에서 택시가 소품을 뚫고 지나가는 사고를 막는다.WarnIfLoadingSpotBlocked— 현관 앞 짐 자리 매트 위에 가구나 바닥 아이템이 올라타면 경고.
WarnIfInDepartureLane— Warns if any alley prop intrudes into the taxi's departure lane (z ≈ −5.6), preventing the taxi from clipping through props during the ending cutscene.WarnIfLoadingSpotBlocked— Warns if any furniture or floor spawn slot overlaps the front-door luggage staging mat.
/// <summary>가구의 실제 렌더러 범위가 매트를 침범하는가(공중에 뜬 것은 제외).</summary>
private static bool OverlapsMat(GameObject target, Rect mat)
{
    Renderer[] renderers = target.GetComponentsInChildren<Renderer>(true);
    if (renderers.Length == 0) return false;

    Bounds bounds = renderers[0].bounds;
    for (int i = 1; i < renderers.Length; i++) bounds.Encapsulate(renderers[i].bounds);

    if (bounds.min.y > LoadingSpotClearHeight) return false;

    Rect footprint = new Rect(bounds.min.x, bounds.min.z, bounds.size.x, bounds.size.z);
    return footprint.Overlaps(mat);
}
/// <summary>Checks whether the combined world-space Renderer bounds overlap the staging mat (excluding ceiling/wall items).</summary>
private static bool OverlapsMat(GameObject target, Rect mat)
{
Renderer[] renderers = target.GetComponentsInChildren<Renderer>(true);
if (renderers.Length == 0) return false;
Bounds bounds = renderers[0].bounds;
for (int i = 1; i < renderers.Length; i++) bounds.Encapsulate(renderers[i].bounds);
if (bounds.min.y > LoadingSpotClearHeight) return false;
Rect footprint = new Rect(bounds.min.x, bounds.min.z, bounds.size.x, bounds.size.z);
return footprint.Overlaps(mat);
}Transform 위치가 아니라 렌더러를 전부 합친 실제 범위로 판정한다. 프리팹의 피벗이 중심에 있으리라는 보장이 없기 때문이다. 높이 조건 하나로 공중에 매달린 오브젝트(조명, 벽걸이)는 걸러 낸다.
The check uses the encapsulated bounds of all child Renderers rather than Transform.position, because prefab pivots are not guaranteed to sit at the geometric center. A single height check (bounds.min.y > LoadingSpotClearHeight) filters out ceiling lights and wall-mounted props.
손 = 칸Hands = Capacity Slots
손 인벤토리는 UnityEngine 의존이 없는 순수 C# 로직으로 분리했다. 테스트하기 쉽고 고치기도 쉽다.
The hand inventory is implemented as a pure C# class with zero UnityEngine dependencies, making it straightforward to unit-test and modify.
/// <summary>지금 차지하고 있는 칸 수.</summary>
public int UsedSlots
{
    get
    {
        int used = 0;
        for (int i = 0; i < items.Count; i++)
        {
            if (items[i] != null) used += items[i].HandCost;
        }
        return used;
    }
}

public int FreeSlots => Capacity - UsedSlots;

/// <summary>이 물건을 들 자리가 있는지. 큰 물건은 빈 칸이 여러 개 있어야 한다.</summary>
public bool CanAdd(ItemDataSO item) => item != null && item.HandCost <= FreeSlots;
/// <summary>Total hand slots currently occupied.</summary>
public int UsedSlots
{
get
{
int used = 0;
for (int i = 0; i < items.Count; i++)
{
if (items[i] != null) used += items[i].HandCost;
}
return used;
}
}
public int FreeSlots => Capacity - UsedSlots;
/// <summary>Returns whether the item fits in the remaining hand slots.</summary>
public bool CanAdd(ItemDataSO item) => item != null && item.HandCost <= FreeSlots;규칙이 HandCost <= FreeSlots 한 줄로 끝난다. 개수가 아니라 비용으로 세기 때문에 나중에 3칸짜리, 4칸짜리 물건을 추가해도 이 코드는 그대로다.
The entire rule reduces to HandCost <= FreeSlots. Because capacity is measured in slot cost rather than item count, adding 3-slot or 4-slot items required zero changes to the inventory class.
뚜껑 압박도Computing Lid Strain
"많이 담았다"가 아니라 "무리하게 쌓았다" 를 수치화해야 했다. 그런데 컨테이너마다 성립하는 항목이 다르다는 문제가 있었다.
I needed a single normalized number representing "how recklessly the player stuffed the container" rather than raw item count—while accounting for the fact that different containers have different layer limits.
public float ComputeLidStrain(float fillWeight, float overHeightWeight, float unevenWeight)
{
    float total = fillWeight + overHeightWeight + unevenWeight;
    if (total <= 0f) return 0f;

    // 방 캐리어(2단)처럼 '초과 높이' 자체가 성립하지 않는 컨테이너에서는
    // 그 항목이 항상 0 이라 압박도가 구조적으로 낮게 깔린다.
    // 그러면 꽉 채워도 지퍼가 쉬워지므로, 남는 가중치를 채움률로 넘긴다.
    float effectiveFillWeight = fillWeight;
    float effectiveOverWeight = overHeightWeight;
    if (FlushLayers >= MaxLayers)
    {
        effectiveFillWeight += overHeightWeight;
        effectiveOverWeight = 0f;
    }

    float strain = FillRate * effectiveFillWeight
                 + OverHeightRatio * effectiveOverWeight
                 + UnevenRatio * unevenWeight;
    return Clamp01(strain / total);
}
public float ComputeLidStrain(float fillWeight, float overHeightWeight, float unevenWeight)
{
float total = fillWeight + overHeightWeight + unevenWeight;
if (total <= 0f) return 0f;
// In containers like the 2-layer room suitcase where 'over-height' cannot occur,
// that term is always 0, which would artificially cap maximum strain.
// Redistribute its weight into FillRate so a full suitcase still challenges the zipper.
float effectiveFillWeight = fillWeight;
float effectiveOverWeight = overHeightWeight;
if (FlushLayers >= MaxLayers)
{
effectiveFillWeight += overHeightWeight;
effectiveOverWeight = 0f;
}
float strain = FillRate * effectiveFillWeight
+ OverHeightRatio * effectiveOverWeight
+ UnevenRatio * unevenWeight;
return Clamp01(strain / total);
}total 로 나누기 때문에 어떤 컨테이너든 0~1 범위가 보장된다.FlushLayers == MaxLayers), OverHeightRatio is always 0. Leaving overHeightWeight idle would make the zipper QTE artificially easy even when the suitcase is 100% full. Transferring unused weight into FillRate keeps the normalized 0–1 output consistent across every container type.밸런스 값(가중치 · 제한시간 · 등급 컷)은 전부 GameConfig / Difficulty ScriptableObject 에 뒀다. 코드에 매직넘버를 심지 않았다.
All tuning parameters—strain weights, time limits, and grade thresholds—live inside GameConfig and Difficulty ScriptableObject assets rather than magic numbers in code.
넘친 칸을 잔상으로 보여주기Showing Multi-Slot Overflow with Ghost Thumbnails
초기 손 슬롯 UI는 2칸짜리 물건이 두 칸을 하나로 병합해 그렸다. 그러다 보니 "몇 칸을 먹는 중인지"가 화면에서 사라졌다. 칸 4개를 언제나 테두리로 그려 두고 물건이 덮은 칸만 색을 바꾸는 구조로 바꿨다.
Early versions of the hand HUD merged adjacent slots into one wide box when holding a 2-slot item. That hid how many total slots were being consumed. I changed the HUD to always render all 4 slot frames and style each slot by state:
- 물건이 실제로 놓인 첫 칸 — 모형을 또렷하게, 칸 하이라이트를 진하게
- 넘쳐서 잡아먹은 칸 — 같은 모형을 알파 0.30 잔상으로, 하이라이트는 옅게
- Anchor slot (where the item starts) — Full-opacity 3D thumbnail and solid border highlight
- Overflow slots (consumed by the same item) — The same 3D thumbnail at 0.30 alpha with a softer border tint
/// <summary>칸을 끄지 않고 색만 바꾼다 — 칸 개수는 언제나 보여야 한다.</summary>
private void SetSlotState(int index, SlotState state)
{
    switch (state)
    {
        case SlotState.Occupied:
            slotFills[index].color = OccupiedSlotColor;
            slotFrames[index].color = OccupiedBorderColor;
            break;

        case SlotState.Overflow:
            slotFills[index].color = OverflowSlotColor;
            slotFrames[index].color = OverflowBorderColor;
            break;

        default:
            slotFills[index].color = EmptySlotColor;
            slotFrames[index].color = EmptyBorderColor;
            break;
    }
}
/// <summary>Updates slot colors without hiding frames — total slot count must always stay visible.</summary>
private void SetSlotState(int index, SlotState state)
{
switch (state)
{
case SlotState.Occupied:
slotFills[index].color = OccupiedSlotColor;
slotFrames[index].color = OccupiedBorderColor;
break;
case SlotState.Overflow:
slotFills[index].color = OverflowSlotColor;
slotFrames[index].color = OverflowBorderColor;
break;
default:
slotFills[index].color = EmptySlotColor;
slotFrames[index].color = EmptyBorderColor;
break;
}
}3D 썸네일은 아이템별 전용 직교 카메라로 RenderTexture 에 굽고(ItemThumbnailStage), 화면에 떠 있는 것만 렌더하도록 카메라를 켜고 끈다.
Each item's 3D thumbnail is rendered into a RenderTexture by a dedicated orthographic rig (ItemThumbnailStage), enabling the camera only for items currently visible on the HUD.
에디터는 되는데 빌드는 검은 화면Works in the Editor, Black Screen in the Build
이 프로젝트에서 가장 오래 붙잡은 문제다. WebGL과 Windows 빌드 양쪽에서, 유니티 로고가 지나간 뒤 화면이 어두운 채로 아무것도 뜨지 않았다.
This was the longest-running bug of the project. In both WebGL and Windows Standalone builds, the Unity splash logo finished and then the screen stayed completely black.
라이팅 베이크를 의심했다. 퀄리티 레벨을 의심했다. WebGL 설정을 뒤졌다. 전부 무관했다.
I suspected lighting bakes, URP quality levels, and WebGL compression settings. None of them had anything to do with it.
Player.log 를 열자 한 번에 나왔다.
Opening Player.log gave the answer immediately:
ArgumentNullException: Value cannot be null. Parameter name: shader
  at UnityEngine.Material..ctor (Shader shader)
  at RushHour.Player.SuitcaseStation.CreateUnlitMaterial
  at RushHour.Core.GameDirector.Awake ()
Shader.Find("Universal Render Pipeline/Unlit") 이 빌드에서만 null 이었다. 이 셰이더를 참조하는 머티리얼 에셋이 프로젝트에 하나도 없었기 때문이다. 코드에서 new Material(Shader.Find(...)) 로만 만들어 쓰다 보니, 빌드 과정에서 "아무도 안 쓰는 셰이더"로 판정되어 통째로 스트리핑됐다. 에디터는 프로젝트 전체 에셋을 검색하므로 언제나 찾아진다.
Shader.Find("Universal Render Pipeline/Unlit") returned null only in player builds. Because every material in the project was created procedurally in code via new Material(Shader.Find(...)) with zero .mat assets on disk referencing URP/Unlit, Unity's build pipeline stripped the shader as unused. In the Editor, Shader.Find searches the entire project asset database, so it always succeeded.
왜 '검은 화면'으로 보였는가Why It Looked Like a Rendering Bug
그 예외가 하필 GameDirector.Awake() 에서 터졌다. 이후 초기화가 전부 중단되면서 타이틀 루틴이 돌지 않았고, ScreenFader(알파 1, 검정)가 화면에 그대로 남았다. 초기화 실패가 화면이 어둡다로 위장한 것이다.
Because the exception was thrown inside GameDirector.Awake(), the rest of the initialization sequence aborted before the title screen could fade in—leaving ScreenFader stuck at alpha 1.0 (solid black). An unhandled initialization exception disguised itself as a graphics bug.
고친 방법은 두 단계다.
I fixed it in two layers:
RuntimeShaders를 두어 런타임 셰이더 이름을 한곳에 모으고, 못 찾으면 예외 대신 파이프라인 기본 셰이더로 폴백한 뒤 에러 로그를 남긴다.- 에디터 스크립트(
JamGraphicsSettings)가 그 목록을 Always Included Shaders 에 자동 등록한다. 씬 빌드·배포 세팅에서 자동 호출되도록 걸어 사람이 기억하지 않아도 되게 했다.
- Centralized all runtime shader lookups in
RuntimeShaders, falling back to the render pipeline's default shader and logging an error instead of throwing if a shader is missing. - Added an editor script (
JamGraphicsSettings) that automatically registers every required shader intoGraphicsSettingsAlways Included Shaders whenever the scene is baked or built.
Player.log(WebGL은 브라우저 콘솔)를 먼저 볼 것. 라이팅을 의심하며 보낸 시간이 로그 한 번 읽는 시간보다 훨씬 길었다.Awake() almost always masquerade as a black screen. Check Player.log (or the browser console in WebGL) before touching lighting or quality settings. Guessing took hours; reading the log took thirty seconds."자꾸 충전기가 사라져요""The Charger Keeps Disappearing"
플레이테스터에게 받은 제보다. 정확히는 침대 밑에 있는데 보이지도 않고 주워지지도 않는다 였다.
A playtester reported that the phone charger kept vanishing. More precisely, it spawned under the bed where it could neither be seen nor picked up.
| 항목 | 값 |
|---|---|
바닥 아이템 자리 Slot_Floor_E | (−2.05, 1.05) |
| 침대 점유 범위 | x −3.74 ~ −1.76 · z 0.86 ~ 2.24 |
| 침대 프레임 밑면 | y ≈ 0.17 |
| Parameter | Value |
|---|---|
Floor spawn slot Slot_Floor_E | (−2.05, 1.05) |
| Bed XZ footprint | x: −3.74 to −1.76 · z: 0.86 to 2.24 |
| Bed frame underside clearance | y ≈ 0.17 |
슬롯이 침대 점유 범위 안에 완전히 들어가 있었다. 프레임 밑면이 낮아 물건이 아래에 갇히고, 프레임 콜라이더가 시선 레이캐스트를 먼저 맞는다. 아이템 위치는 매 판 셔플되므로 충전기 버그가 아니라 무엇이든 사라질 수 있는 버그였다.
Slot_Floor_E sat completely inside the bed's XZ footprint. The low bed frame trapped the item underneath and intercepted the player's interaction raycast. Because item spawn positions shuffle every run, any floor item could vanish into that slot.
좌표를 옮기는 것으로 끝내지 않고, 앞에서 만든 빌드타임 겹침 검증을 바닥 슬롯 전체 × 배치안 전체로 확장했다. 현관 앞 매트가 책상·의자 밑에 깔려 있던 문제를 같은 방식으로 이미 잡았기 때문에 그대로 재사용할 수 있었다.
After moving the coordinate, I extended the build-time overlap validator to test all floor spawn slots against all furniture layout presets—reusing the same Renderer bounds check that guarded the front-door mat.
금지 대신 대가Replacing a Hard Block with a Cost
설계 판단 중 가장 마음에 드는 변경이다. 원래는 손에 물건이 남아 있으면 가방 닫기가 거부됐다. 시간에 쫓기는 게임에서 "지금은 닫을 수 없다"는 벽은 재미가 아니라 답답함이었다.
This was my favorite design change. Originally, if you still held items in your hands, the game refused to let you close the suitcase. In a frantic timed game, hitting a "you can't do that right now" wall felt frustrating rather than tactical.
그래서 닫기를 막지 않기로 했다. 대신 손에 든 것을 실제로 내던지고 닫는다. 가방이 터질 때 쓰던 포물선 연출을 재사용해 물건이 바닥에 남고, 시간이 남으면 다시 주워 담을 수 있다. 던진 물건은 격자에 없으니 자동으로 '못 챙긴 것'으로 채점된다.
So I removed the block: pressing Close while holding items physically tosses your held items onto the floor and starts the zipper QTE immediately. It reuses the parabolic scatter arc from the suitcase burst animation; if time remains, you can still pick the items back up, and if not, they simply count as unpacked.
- 초과 적재로 어차피 못 닫는 경우에는 손을 건드리지 않는다. 잃기만 하고 닫히지도 않는 최악을 막는다.
- 프롬프트도 손 상태에 따라
[SPACE] 가방 닫기↔[SPACE] 손에 든 걸 내던지고 닫기로 바뀌어 사전 경고가 된다.
- If the suitcase is over-stacked and cannot possibly close anyway, held items are not tossed—avoiding punishing the player twice.
- The interaction prompt dynamically switches between
[SPACE] Close Suitcaseand[SPACE] Toss Held Items & Closeso the consequence is clear beforehand.
잼 마감 이후 고친 것들Post-Jam Improvements
화장실 — 두 번째 공간Adding a Bathroom — A Second Room
방 하나에 아이템 31종을 밀어 넣다 보니 물건이 가구 밑에 끼는 사고가 났고, "다 보이는 한 화면"이라 탐색의 재미도 적었다. 북쪽 벽에 문 구멍을 내고 2.7 × 2.4 m 화장실을 붙였다. 세면대·변기·샤워부스·거울을 전부 프리미티브 조합으로 세웠다.
Cramming all 31 items into a single bedroom crowded the floor and flattened exploration because almost everything was visible from the center of the room. I cut a doorway into the north wall and attached a 2.7 × 2.4 m bathroom built from primitives (sink, toilet, shower booth, mirror).
여기서 한 가지 결정을 했다. 세면도구 · 상비약 · 수건 · 슬리퍼는 일부러 셔플하지 않는다. 세면도구가 침대 위에 있으면 그냥 랜덤이지만, 세면대 옆에 있으면 "아 맞다 화장실" 이 된다. 탐색이 추리가 되는 지점이다.
I also made a deliberate rule: toiletries, medicine, towels, and slippers never shuffle outside the bathroom. Finding a toothbrush on a bed feels like random noise; remembering "wait, I haven't checked the bathroom sink" turns searching into common-sense deduction.
문 기믹은 난이도가 아니라 시간을 쓰게 하는 장치The Bathroom Door as a Time-Sink Mechanic
| 난이도 | 화장실 문 |
|---|---|
| 튜토리얼 · EASY | 잠김. 방 안에서만 플레이 |
| NORMAL | 열린 채 시작 |
| HARD | 열 때마다 60% 확률로 뻑뻑해져 QTE |
| Difficulty | Bathroom Door Behavior |
|---|---|
| Tutorial · EASY | Locked; all items spawn inside the bedroom |
| NORMAL | Starts open |
| HARD | 60% chance the latch jams on open, triggering a short QTE |
안에 들어가면 등 뒤에서 한 번 닫힌다. 필수품(세면도구)이 그 안에 있으니 "지금 가지러 갈 것인가"가 진짜 판단이 된다. 자동 닫힘을 한 번으로 제한한 이유는, 왕복마다 QTE면 학습이 아니라 고문이 되기 때문이다.
Once you step inside the bathroom, the door swings shut behind you once. Because required toiletries are inside, deciding *when* to make the bathroom trip matters. Auto-closing is capped at once per run because triggering a door QTE on every round-trip would be tedious rather than tense.
같은 입력을 여러 곳이 동시에 읽었다Multiple Views Reading the Same Input Frame
이 프로젝트 UI는 EventSystem 없이 각 뷰가 wasPressedThisFrame 을 직접 읽는다. 그 대가를 세 가지 버그로 치렀다.
Because the custom UI reads wasPressedThisFrame directly without Unity's EventSystem, three input collision bugs surfaced:
- 랭킹 이름칸에
R을 치면 게임이 재시작됐다. →UiFocus중재자를 두고, 입력을 읽는 모든 곳이 "지금 글자를 받는 중인가"를 먼저 묻게 했다. - 타이틀 버튼을 화면 중앙으로 옮겼더니 난이도 카드와 자리가 겹쳐 한 번의 클릭이 두 뷰에서 처리됐다. 창이 뜨자마자 카드가 선택됐다. → 창이 열린 그 클릭은 버튼을 뗄 때까지 무시한다.
- 문 QTE 중에 시점이 돌아가고
[E]로 문이 그냥 열려 QTE를 건너뛸 수 있었다. → QTE 동안 시점·상호작용·크로스헤어를 함께 잠근다.
- Typing
Rinto the leaderboard name field restarted the match. → Added aUiFocusmediator so gameplay hotkeys yield whenever text input is active. - Moving the title button to the screen center caused a single click to hit both the title button and the difficulty card underneath on the same frame. → Consumed the opening click until mouse release.
- During the bathroom door QTE, the player could still move the camera and press
[E]to open the door normally, bypassing the QTE. → Locked camera look, interaction raycasts, and the crosshair while any QTE is active.
이벤트의 의미를 잘못 읽었다Misreading an Event Name
지퍼 위젯의 Failed 는 "실패로 끝났다"가 아니라 "한 번 놓쳤다" 다. QTE는 3~4회 반복되기 때문이다. 그런데 그 시점에 QTE 용도를 되돌려 버려서, 문 QTE 중 한 번 놓치면 뒤이은 Completed 가 가방을 닫은 것으로 처리돼 택시 막으로 넘어갔다.
In the zipper QTE widget, the Failed event meant "missed one needle check", not "the entire QTE ended in failure" (since a QTE takes 3–4 checks). Because my handler reset the active QTE context on Failed, missing once on the bathroom door reset the context to default (Suitcase), causing the subsequent Completed event to close the suitcase and transition straight to Act 2.
용도 해제를 최종 이벤트(Completed · Burst)에서만 하도록 나눴다. 이벤트 이름이 상태를 정확히 말해 주지 않으면 이런 일이 생긴다.
I split the events so context cleanup only runs on terminal events (Completed or Burst). Ambiguous event names invite state bugs.
타이틀에서 걷어낸 것Stripping Down the Title Screen
잼 이름 · 주제 · 규칙 4줄 · 조작키 4줄을 전부 지우고 제목 + 한 줄 + 세로 버튼만 남겼다. 규칙은 튜토리얼이, 조작은 인게임 프롬프트가 가르친다. 타이틀에 조작키를 나열하는 건 설명서지 타이틀이 아니다.
I removed the jam name, theme banner, 4-line rules block, and 4-line keybind list from the title screen, leaving only the title, a one-line hook, and vertical buttons. Tutorials teach rules; contextual prompts teach controls. Listing keybinds on a title screen is a manual, not a title screen.
- 난이도 카드마다 인게임 캡처를 얹고 설명 문단은 없앴다. 다섯 장에 문단이 다섯 개면 아무도 안 읽는다.
- 튜토리얼 9단계는 규칙을 바꾸지 않고 안내 한 줄과 3D 표식만 띄운다. 각 단계는
[F]로 건너뛸 수 있다. 튜토리얼에 갇히는 것보다 나쁜 건 없다. - 버튼이 눌린 표시는 0.09초 유지한다. 한 프레임으로는 눌린 티가 안 보인다.
- 인트로 컷씬에 스킵을 넣었다. 재시작이 잦은 게임에서 못 넘기는 연출은 짐이다.
- Replaced paragraph descriptions on the five difficulty cards with in-game screenshots.
- The 9-step tutorial overlays a one-line prompt and a 3D marker without altering core rules, and every step can be skipped with
[F]. - Held button press visual feedback for 0.09 seconds so clicks register clearly to the eye.
- Added a skip prompt to the intro cutscene so repeat runs stay snappy.
온라인 랭킹WebGL-Compatible Online Leaderboard
Firebase Realtime Database 를 쓰는데, 공식 Unity SDK 가 WebGL 을 지원하지 않는다. REST + 익명 인증으로 직접 구현했다. 플러그인 0개라 에디터에서도 그대로 테스트된다. 난이도별로 판을 나누고, 이름은 클라이언트와 서버 규칙 양쪽에서 영문·숫자만 허용한다.
Because the official Firebase Unity SDK does not support WebGL, I implemented the leaderboard directly over REST with anonymous auth. With zero native plugins, it runs identically in the Editor and in WebGL, partitioning boards by difficulty and validating alphanumeric nicknames on both client and server.
정리Takeaways
한 달 일정의 게임잼 규모를 5일에 완주하고 배포까지 마쳤다. 프로토타입이 아니라 인트로 컷씬 → 탐색 → 정리 → QTE → 2막 → 채점 → 엔딩까지 이어지는 완결된 루프다.
I completed and deployed a full game loop—intro cutscene, room search, 3D grid packing, zipper QTE, Act 2 trunk loading, scoring, and epilogue—in five days.
속도의 원천은 씬을 손으로 만들지 않은 것이었다. 프리팹·배치·배선을 전부 코드로 굽는 구조 덕분에 방 구성을 몇 번이고 다시 만들 수 있었고, 좌표 실수를 빌드 시점 경고로 잡는 안전망까지 같은 코드에서 얻었다.
The biggest speed multiplier was never building scenes by hand. Generating prefabs, room layouts, and object references in C# let me rebuild the level cleanly at any time and gave me automated build-time geometry checks for free.
가장 값진 교훈은 디버깅 태도였다. "에디터에서는 되는데 빌드에서는 안 된다"는 증상 앞에서 라이팅·퀄리티·플랫폼 설정을 먼저 의심했지만, 정답은 로그 한 줄에 있었다. 이후 이 유형(셰이더 스트리핑 · Resources 경로 · OS 폰트 의존)을 표로 정리해 프로젝트 문서에 남겼다.
The sharpest debugging lesson was simple: when a build shows a black screen, read Player.log before guessing at lighting or platform settings. I documented shader stripping, Resources path pitfalls, and OS font dependencies in a checklist for future builds.
그리고 금지보다 대가를 주는 설계가 낫다는 것을 체감했다. 손에 물건이 남으면 닫기를 막던 규칙을 "내던지고 닫되 점수로 대가를 치른다"로 바꾼 뒤 플레이 흐름이 눈에 띄게 매끄러워졌다.
Finally, attaching a cost works better than a hard prohibition. Letting players toss held items to slam the suitcase shut—paying for it on the scoreboard rather than hitting an artificial UI block—made the time-pressure loop feel much more natural.
다음 목표는 점수 산정의 가시화와 캐리어 내부 표현 교체(칸 단위 컬러 블록 → 실제 물품 메시)다. 둘 다 "이 게임이 무엇을 요구하는지"를 더 정직하게 보여 주는 작업이다. 자체 테스트에서 필수품인 여권을 놓쳤는데도 S 등급이 나오는 밸런스 문제를 발견했는데, 점수를 눈에 보이게 만들면 그것도 함께 드러난다. 등급 컷 재조정이나 "필수품 누락 시 상위 등급 불가" 하드캡을 같이 검토하고 있다.
Next up are score breakdown visualization and replacing solid-color grid blocks inside the suitcase with actual 3D item meshes—alongside fixing a balance issue where a player could still earn an S rank after forgetting their passport.